数据集链接:https://pan.baidu.com/s/1IBe_P0AyHgZC39NqzOxZhA?pwd=nztc
提取码:nztc
- UNet模型
import torch
import torch.nn as nn

class conv_block(nn.Module):
    def __init__(self, ch_in, ch_out):
        super(conv_block, self).__init__()
        self.conv = nn.Sequential(
            nn.Conv2d(ch_in, ch_out, kernel_size=3, stride=1, padding=1, bias=True),
            nn.BatchNorm2d(ch_out),
            nn.ReLU(inplace=True),
            nn.Conv2d(ch_out, ch_out, kernel_size=3, stride=1, padding=1, bias=True),
            nn.BatchNorm2d(ch_out),
            nn.ReLU(inplace=True)
        )
    def forward(self, x):
        x = self.conv(x)
        return x

class up_conv(nn.Module):
    def __init__(self, ch_in, ch_out):
        super(up_conv, self).__init__()
        self.up = nn.Sequential(
            nn.Upsample(scale_factor=2),
            nn.Conv2d(ch_in, ch_out, kernel_size=3, stride=1, padding=1, bias=True),
            nn.BatchNorm2d(ch_out),
            nn.ReLU(inplace=True)
        )
    def forward(self, x):
        x = self.up(x)
        return x
class UNet(nn.Module):
    def __init__(self, img_ch=3, output_ch=1):
        super(UNet, self).__init__()
        self.Maxpool = nn.MaxPool2d(kernel_size=2, stride=2)
        self.Conv1 = conv_block(ch_in=img_ch, ch_out=64)
        self.Conv2 = conv_block(ch_in=64, ch_out=128)
        self.Conv3 = conv_block(ch_in=128, ch_out=256)
        self.Conv4 = conv_block(ch_in=256, ch_out=512)
        self.Conv5 = conv_block(ch_in=512, ch_out=1024)
        self.Up5 = up_conv(ch_in=1024, ch_out=512)
        self.Up_conv5 = conv_block(ch_in=1024, ch_out=512)
        self.Up4 = up_conv(ch_in=512, ch_out=256)
        self.Up_conv4 = conv_block(ch_in=512, ch_out=256)
        self.Up3 = up_conv(ch_in=256, ch_out=128)
        self.Up_conv3 = conv_block(ch_in=256, ch_out=128)
        self.Up2 = up_conv(ch_in=128, ch_out=64)
        self.Up_conv2 = conv_block(ch_in=128, ch_out=64)
        self.Conv_1x1 = nn.Conv2d(64, output_ch, kernel_size=1, stride=1, padding=0)

    def forward(self, x):
        # encoding path
        x1 = self.Conv1(x)
        x2 = self.Maxpool(x1)
        x2 = self.Conv2(x2)
        x3 = self.Maxpool(x2)
        x3 = self.Conv3(x3)
        x4 = self.Maxpool(x3)
        x4 = self.Conv4(x4)
        x5 = self.Maxpool(x4)
        x5 = self.Conv5(x5)
        # decoding + concat path
        d5 = self.Up5(x5)
        d5 = torch.cat((x4, d5), dim=1)
        d5 = self.Up_conv5(d5)
        d4 = self.Up4(d5)
        d4 = torch.cat((x3, d4), dim=1)
        d4 = self.Up_conv4(d4)
        d3 = self.Up3(d4)
        d3 = torch.cat((x2, d3), dim=1)
        d3 = self.Up_conv3(d3)
        d2 = self.Up2(d3)
        d2 = torch.cat((x1, d2), dim=1)
        d2 = self.Up_conv2(d2)
        d1 = self.Conv_1x1(d2)
        output = torch.sigmoid(d1)  # 在最后加上Sigmoid激活函数
        return output
- 数据加载
import os
from PIL import Image
from torch.utils.data import Dataset
from torchvision import transforms

class SegmentationDataset(Dataset):
    def __init__(self, image_dir, mask_dir, output_size=(256, 256)):
        self.image_dir = image_dir
        self.mask_dir = mask_dir
        self.image_list = os.listdir(image_dir)
        self.output_size = output_size
        # 定义图像和掩码的变换
        self.image_transform = transforms.Compose([
            transforms.Resize(self.output_size),
            transforms.ToTensor()
        ])
        self.mask_transform = transforms.Compose([
            transforms.Resize(self.output_size),
            transforms.ToTensor()
        ])

    def __len__(self):
        return len(self.image_list)

    def __getitem__(self, idx):
        image_name = self.image_list[idx]
        image_path = os.path.join(self.image_dir, image_name)
        mask_path = os.path.join(self.mask_dir, image_name)
        image = Image.open(image_path).convert("RGB")  # 确保是RGB
        mask = Image.open(mask_path).convert("L")  # 确保是灰度图像
        image = self.image_transform(image)
        mask = self.mask_transform(mask)
        return image, mask
- 训练和测试。训练函数中保存的最好模型后缀最大(因为loss小才保存当前这个epoch的模型,我训练的最好模型是第171轮产生的),测试代码包含计算模型性能指标的代码和保存结果图片的代码。
import os
import numpy as np
import torch
import torch.optim as optim
from sklearn.metrics import confusion_matrix
from torch import nn
from torch.utils.data import DataLoader
import matplotlib.pyplot as plt
from tqdm import tqdm
from UNet import UNet
from DataLoader2 import SegmentationDataset

# IoU计算
def compute_iou(pred_mask, true_mask):
    smooth = 1e-6  # 避免分母为0
    pred_mask = (pred_mask > 0.5).float()
    true_mask = (true_mask > 0.5).float()

    intersection = (pred_mask * true_mask).sum()
    union = pred_mask.sum() + true_mask.sum() - intersection

    return (intersection + smooth) / (union + smooth)

# Dice系数计算
def compute_dice(pred_mask, true_mask):
    smooth = 1e-6  # 避免分母为0
    pred_mask = (pred_mask > 0.5).float()
    true_mask = (true_mask > 0.5).float()

    intersection = (pred_mask * true_mask).sum()

    return (2. * intersection + smooth) / (pred_mask.sum() + true_mask.sum() + smooth)

# 精度、召回率和F1分数计算
def compute_precision_recall_f1(pred_mask, true_mask):
    pred_mask = (pred_mask > 0.5).numpy().astype(int)
    true_mask = (true_mask > 0.5).numpy().astype(int)

    # 将mask平展为一维数组
    pred_mask_flat = pred_mask.flatten()
    true_mask_flat = true_mask.flatten()

    conf_matrix = confusion_matrix(true_mask_flat, pred_mask_flat)
    tn, fp, fn, tp = conf_matrix.ravel()

    precision = tp / (tp + fp)
    recall = tp / (tp + fn)
    f1_score = 2 * (precision * recall) / (precision + recall)

    return precision, recall, f1_score


# 训练函数
def train():
    model = UNet()
    dataset = SegmentationDataset('./dataset_exp2/train/image', './dataset_exp2/train/label')
    dataloader = DataLoader(batch_size=16, shuffle=True, dataset=dataset)
    # 训练参数
    num_epochs = 200
    learning_rate = 1e-4
    # 损失函数和优化器
    criterion = nn.BCELoss()
    optimizer = optim.Adam(model.parameters(), lr=learning_rate)
    # 设备
    device = torch.device('cuda:3' if torch.cuda.is_available() else 'cpu')
    model = model.to(device)
    model.train()
    best_loss = float('inf')
    for epoch in range(num_epochs):
        epoch_loss = 0
        for images, labels in dataloader:
            images = images.to(device)
            labels = labels.to(device)
            outputs = model(images)

            loss = criterion(outputs, labels)
            optimizer.zero_grad()
            loss.backward()
            optimizer.step()
            epoch_loss += loss.item()

        if epoch_loss < best_loss:
            best_loss = epoch_loss
            torch.save(model.state_dict(), f'./save_model_UNet/res_{epoch + 1}.pth')
        print(f'Epoch {epoch + 1}/{num_epochs}, Loss: {epoch_loss / len(dataloader)}')


def test():
    model = UNet()
    # 确保模型在CPU上
    model.load_state_dict(torch.load('./save_model_UNet/res_171.pth'))
    save_dir = './test_results_UNet'
    model.eval()
    dataset = SegmentationDataset('./dataset_exp2/test/image', './dataset_exp2/test/label')
    dataloader = DataLoader(batch_size=1, shuffle=False, dataset=dataset)
    iou_list = []
    dice_list = []
    precision_list = []
    recall_list = []
    f1_list = []
    plt.ion()
    with torch.no_grad():
        for idx, (images, labels) in tqdm(enumerate(dataloader)):
            pre = model(images)
            img_pre = torch.squeeze(pre)
            img_true = torch.squeeze(labels)
            iou = compute_iou(img_pre, img_true)
            dice = compute_dice(img_pre, img_true)
            precision, recall, f1_score = compute_precision_recall_f1(img_pre, img_true)
            img_pre = img_pre.numpy()
            img_true = img_true.numpy()
            img_x = torch.squeeze(images).numpy().transpose(1, 2, 0)
            img_x = (img_x * 255).astype(np.uint8)  # 恢复到0-255的范围
            # 保存结果
            plt.figure(figsize=(12, 4))
            plt.subplot(1, 3, 1)
            plt.title('Input Image')
            plt.imshow(img_x)
            plt.axis('off')

            plt.subplot(1, 3, 2)
            plt.title('True Mask')
            plt.imshow(img_true, cmap='gray')
            plt.axis('off')

            plt.subplot(1, 3, 3)
            plt.title('UNet Predicted Mask')
            plt.imshow(img_pre, cmap='gray')
            plt.axis('off')

            plt.savefig(os.path.join(save_dir, f'result_{idx + 1}.png'))
            plt.close()  # 关闭当前figure,避免内存占用过多

            iou_list.append(iou.item())
            dice_list.append(dice.item())
            precision_list.append(precision)
            recall_list.append(recall)
            f1_list.append(f1_score)

        plt.ioff()  # 关闭交互模式
        print(f'Results saved in {save_dir}')
        print(f'Average IoU: {np.mean(iou_list)}')
        print(f'Average Dice Coefficient: {np.mean(dice_list)}')
        print(f'Average Precision: {np.mean(precision_list)}')
        print(f'Average Recall: {np.mean(recall_list)}')
        print(f'Average F1 Score: {np.mean(f1_list)}')

if __name__ == '__main__':
    print('++++++++++++++++train++++++++++++++++')
    train()
    print('++++++++++++++++test++++++++++++++++')
    test()
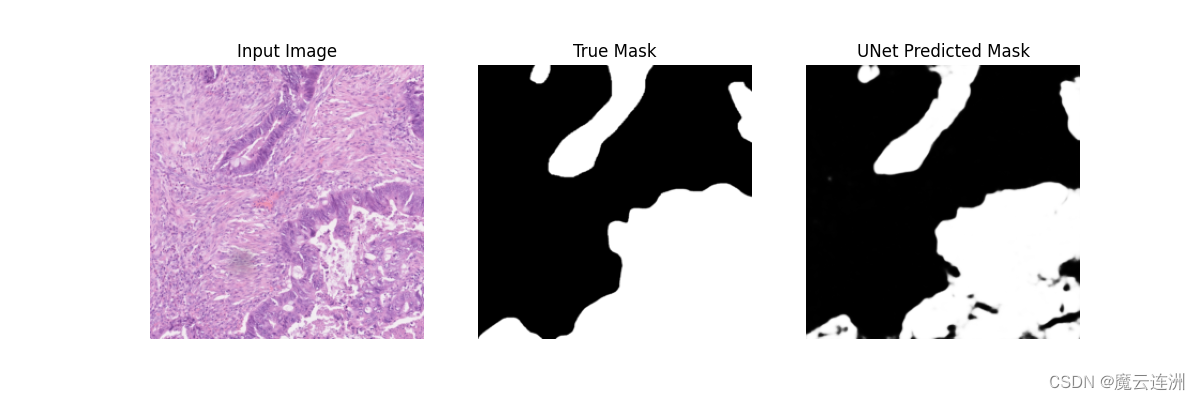
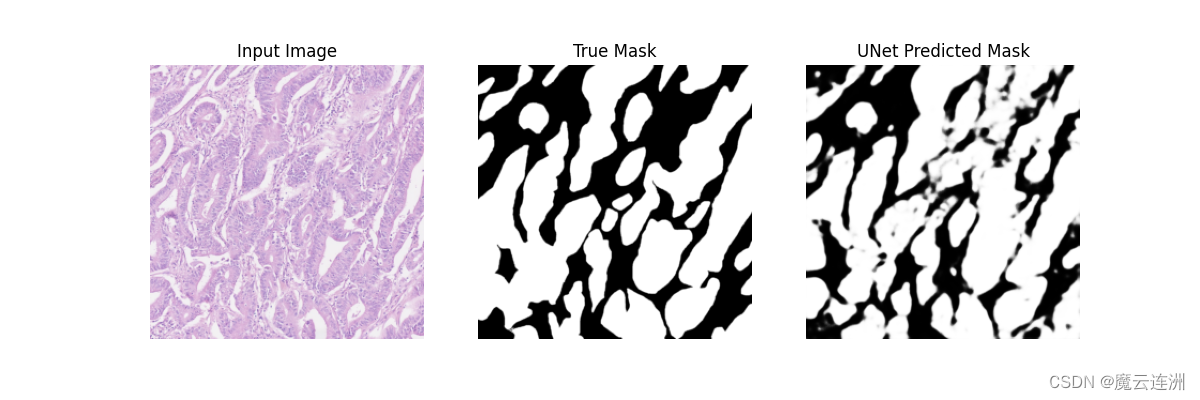
测试效果: